Monday 26 January 2015


Update: Microsoft promised a new build of Windows 10 next week, and also confirmed previous rumors that the first build of the operating system for smartphones will be released in February.
If you are on Windows 7, Windows 8.1 or Windows Phone 8.1, you will be eligible for a free upgrade inside the first year of Windows 10. Microsoft made the announcement this morning at an event on its corporate campus outside of Seattle.
On stage, Microsoft’s Terry Myerson pitched Windows 10 as a service, instead of simply an operating system that a user installs. Or, put more simply, the company views the next version of Windows as the hub of its various services.
2015-01-21_0920
By offering a free upgrade to Windows 10, Microsoft is essentially working to grow the userbase of its next operating system, which will grow its developer opportunity. Microsoft needs to grow the cadre of developers that build programs for its platform. In the era of Android and iOS, Microsoft has found itself behind its competition when it comes to interest, and attention.
Windows 10 will work across device form factors, so the company offering it to both handsets and desktop PC users is not surprising. However the choice to offer it to Windows 7 users was notable — Microsoft is essentially forgoing a chunk of revenue that it could have at least have theoretically earned.
The free upgrade plan should allow Microsoft to lessen the current version fragmentation that Windows endures. Windows 7 becomes even more dated as another version of Windows is released, but remains the most popular operating system for PCs in the world. Microsoft wants those users to get onto Windows 10.

Not content with spinning out apps for stickers inside MessengerGroups and new additionRooms, Facebook has launched another standalone app. Facebook Lite, which some may recall as a simplified version of its mobile website from 2009-2010, is specifically designed for low-end Android devices in emerging markets.
TechCrunch understands that the app was quietly launched in a handful of countries in Asia and Africa over the weekend — Bangladesh, Nepal, Nigeria, South Africa, Sudan, Sri Lanka, Vietnam and Zimbabwe to be precise — where it is being testing with a view to further expansions. That said, a wider launch is not a certainty and Facebook could quietly can the project if it doesn’t believe it is worth pursuing.
The app has been built to accommodate low-end and dated Android devices — it is just 252 KB in size — and those on 2G/poor quality internet connections. It’s based on Snaptu, Facebook’s feature phone client, but includes some native Android features, such as push notifications and camera integration, to make the experience a more sophisticated one.
fb lite
Why is Facebook launching yet another app? Smartphone sales are soaring in India, which was the fastest growing market in Asia Pacific in Q3 2014, while there’s huge potential in Africa and Southeast Asia where mobile will be (or already is) the primary internet platform for millions. Even though Facebook retooled its Android app specifically for emerging markets last year, it is making sure that it offers a good experience to any user not matter their device or network connection. (Android is the platform of choice for most smartphone owners in emerging markets since devices can cost upwards of $30.)
Facebook already has its Internet.org project, which provides free access to a range of mobile internet services including, of course, Facebook. Internet.org is currently limited to a selection of countries in Africa at this point and, since it is being developed in partnership with carriers and other telecom industry players, launches are time and resource intensive: so why not pull together a ‘Lite’ app that can potentially be pushed to millions overnight, that’s Facebook’s thinking here.
If you’re in one of the aforementioned eight countries where Facebook Lite has launched — and you have an Android phone — then you can check it out here.
The early signs seem positive. The app has already crossed 10,000 downloads at the time of writing, with a 4.6 rating from an initial 693 reviewers. The few early users tweeting about it seem impressed too.
By http://techcrunch.com/2015/01/25/facebook-lite-rides-again/
iOS 8.1 tips and tricks: See what your iPhone and iPad can do now
iOS 8.1 brings a host of new features, tips and tricks. We worked our way through the operating system to try and bring you as many of the new features as possible to allow you to get as much out of the latest software on your phone without having to upgrade to the iPhone 6 or iPhone 6 Plus.
Most of these tips are new to iOS 8, but we've also included some gems from iOS 7 that you might not have found yet.
Either way we can be sure to promise that there should be plenty here for new users and power users alike to get the most out of the operating system when they upgrade their current iPhone or switch to the iPhone 6 or iPhone 6 Plus.
We'll be keeping an eye on things as updates roll out and if you've got any tips of your own that we've not covered please feel free to add them to the comments below.
Enjoy:

Mail for iOS tricks

Mark as Read: In your inbox swipe from left to right to reveal a "Mark As Read" icon. If it's a conversation you will have to do this for as any time as there are unread messages.
More, Flag, Trash: Swiping from right to left reveals quick actions to let you do a number of things. More brings up a secondary menu to let you reply, forward, flag, mark as unread, move to junk, or notify you of future messages in this conversation while Flag and Trash let you do just that.
Quick delete (Trash): If you do a continual swipe from right to left on an email in the inbox it will delete it without you having to swipe and then tap delete (Trash).
Changing the swipe options: You can also change what happens when you swipe left or right in Settings. Go Settings > Mail, Contacts, Calendars > Swipe Options and then set your Swipe Left command and your Swipe Right command. Options are limited, but it is something.
Minimise email you are working on: If you are mid composing or replying you can now drag that email to the bottom of the screen so you can still access the rest of your inbox. To do this press ad hold on the title of the email at the top and drag towards the bottom. To get it back, just tap on the parked email.
Reply notifications: If you are waiting for a specific response from an email and don't want to have to keep checking your phone every two minutes you can opt for iOS 8 to notify you. In any message you've received tap on the Flag icon at the bottom left of the screen and then select Notify Me. Confirm your decision and when they reply you'll know about it. To send an email with a notification alert already one it, select the bell icon in the subject line.
Time Zone override: The Time Zone Override when on will let you always show event data and times in the selected time zone. When off, events will display according to the time zone of your current location. If that sounds like something you want go to Settings > Mail, Contacts, Calendar > Time Zone Override and toggle away.
Build out your contacts book: When you get get a mail from someone and they've got a signature, Apple now reads that information and asks you whether you want to add it to a contact. If you don't you can choose to ignore, but if you do, press on the Add to Contacts button at the top of the screen.
Unread emails: Finally you can now see how many unread emails you've got. Go to Mail > Mailboxes > Edit and select Unread.
VIP, Flagged, All Sent, To or CC, Attachments, All Drafts: You can also do the same for a host of other folders to for the first time. Go Mail > Mailboxes > Edit and select which ones you want.
Change Flag style: Yep you can change the Flag Style from flags to circles if that gets you excited. Settings > Mail, Contacts, Calendars > Flag Style.
Search: Drag down in your inbox to reveal a search box. You can now search your entire inbox for a keyword rather than just To, From, Subject. You can also limit your search to All mailboxes or the current mailbox you are in. Furthermore you can also limit it to conversation threads.
Mark all as read: You can now mark all as read in Mail. Yay. In a mailbox, or the combined inbox, you just tap "Edit" at the upper right, then tap "Mark All" at the lower left. Then choose "Mark As Read" from the pop-up menu and all your messages should be marked as read.

General iOS 8 tips


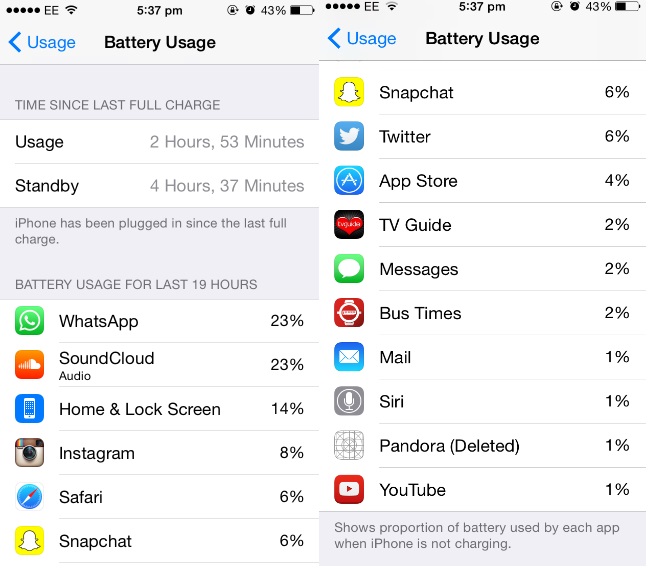
Find battery guzzling apps: Apple doesn't specifically tell you which apps are using the most memory, but it does allow you to check which apps have used the most battery over the last 24 hours or 6 days. Go to Settings > General > Usage > Battery Usage. Here you'll be able to see if a certain app has been used more than others. That might help change how you use that app.
Standard or Zoomed: On the iPhone 6 and iPhone you can change the display setting from Standard or Zoomed. To switch between the two if you've changed your mind after setup go to Settings > Display > Display Zoom and select Standard or Zoomed.
Set the brightness: It's now moved from Wallpapers & Brightness to Display and Brightness.
Text Size and Bold Text: To change the default text size and whether you want all fonts to be bold to make the easier to read go to Display & Brightness > Bold Text.
Favourite and recent people: Double tap on the home button to reveal the app tray. Above your apps you'll see circles of the people you've recently talked or messaged with. Swipe to the left to reveal your Favourites. Pressing on their face (or icon) reveals shortcuts to call, message, FaceTime, and FaceTime Audio them.
Disable Favourites and contacts showing in App Switcher: Go to Settings > Mail, Contacts, Calendar scroll down and toggle "Show in App Switcher". When you go back to the App Switcher mode they will have gone.
10-day forecast in weather: Go to weather, and on any city swipe up. You now get to see the 10 day forecast as well as additional information like a mini weather forecast for the day, sunrise and sunset times and the chance of rain.
Hey Siri: To get siri working by just shouting at it rather than pressing a button go to Settings > General > Siri > Allow "Hey Siri". A word of note you will need to have it connected to a power source for it to work.
Choose a new wallpaper: New wallpapers to be had in the Settings > Wallpaper.
Setting up Do Not Disturb: If you travel a lot to different time zones it's probably a good idea to schedule your iPhone to go into to Do Not Disturb mode. Go to Settings > Do Not Disturb and then schedule in a time. We've set ours from midnight to 6am. During that time all calls and alerts will be silenced. If you are worried that you might miss an important call you can set the phone to allow calls from Favourites or repeated calls if someone is calling more than once in a three-minute window. You can now in iOS 7 set it so the Do Not Disturb works only when you've got the phone locked or all the time regardless of what you are doing. Handy if you are in the middle of a presentation.
Creating nested folders: It's a glitch, but it does work if you are timely. Create a Nested folder by dragging one app icon on to another one. Then quickly drag that folder into an existing folder. If you are not timely enough, keep trying and you should achieve a nested folder.

More from Safari in iOS 8 

DuckDuckGo: If you want to set DuckDuckGo as your default search engine over Google, Yahoo, or Bing, go to Settings > Safari > Search Engine and select the private friendly search engine as the default.
Auto suggesting websites: Like Safari on the desktop you can have the iPhone or iPad Safari recommend suggested search results as you type. It's on as default but if you don't want it, go to Settings > Safari > Search Engine Suggestions and toggle the feature off.
Auto suggesting apps: Likewise as you type in popular app names into the Safari search url box Apple will try and match that with apps you either have or might want. It's on as default, but if you want to turn if off go to Settings > Safari > Spotlight Suggestions.
Getting the website link quickly: Settings > Safari > Quick Search will determine whether Safari offers up website matches or not for you.
Making websites load faster or saving your data: Safari in iOS 8 preloads the first hit of the search result to make loading your choice seem quicker. The downside is that this could use up data. If you want to turn it off go to Settings > Safari > Preload Top Hit and turn it off.
Searching on page: If you are looking for a specific word on a page, simply start typing that word into the URL bar at the top of the page. The results will show you the google search results first but if you scroll down it will show you "On This Page" and let you jump through the mentions of that page.
Scan your credit card: Rather than having to type all your details you can now use the camera to scan your credit card. When it comes to entering the credit card details either press to auto fill if you are already using that feature with Keychain, or press it and then select Use Camera on the next menu you get.
Swipe forwards and backwards: Swiping from off the screen on to the screen from the left of the screen goes back through your browsing history while swiping from the right of Safari goes forward through your browsing history.

Getting Handoff and Continuity to work

Enabling Handoff between iOS 8 devices: Go to General > Handoff & Suggested Apps and then toggle the box.
Accessing Handoff apps: On the Lock Screen press the app icon in the bottom left corner or if you are using the phone already, double tap the Home button and swipe left to reveal the app page to the left of the home screen.
Stopping your iPad ring when someone calls your iPhone: One of the new features of iOS allows you to take calls on all your devices regardless. To stop you feeling like you are in the last scene of lawnmower man where all the phones ring at once go to Settings > Face time and turn iPhone cellular calls ring.
Allowing SMS messages on your Mac: To do this you need to enable the feature on your iPhone. Make sure you are running iOS 8.1 and then go to Settings > Messages > Text Message Forwarding. Find your Mac or iPad you want to allow access and pair the two devices with a security code. You’ll now be able to see and send Text messages via the desktop.

HealthKit

No thank you to certain apps: If you don't want apps requesting access to the Health app, turn them off by going to Settings > Privacy > Health
See which apps are giving data to Health: Go into the app and click on the Sources icon at the bottom

iOS 8 Keyboard tricks

Adding Emoji keyboard: Go to Settings > General > Keyboards > Keyboards > Add New Keyboard. Scroll down and select the Emoji keyboard (it's after the Dutch keyboard) - :)
Adding third party keyboards: Install the app and follow the instructions in the app. At some point it will ask you to go to Settings > General > Keyboard > Keyboards and add the third-party keyboard.
Accessing additional keyboards beyond Emoji: If you have more than three keyboards installed the keyboard will show a globe icon next to the spacebar. In any app that has a keyboard tap on that globe icon and then again to reveal the next keyboard you've got installed.
Hiding or showing auto suggestions on QuickType keyboard: The new Apple keyboard shows word suggestions on what you type. If you don't use this you can hide it to give you more space on the screen. gently press and hold at the top of the auto-suggest bar and drag it towards the top row of keys. You can bring it back by dragging up from the top of the keyboard if you change your mind.

iOS 8 Messages tips


What time?: See when a message was sent by dragging the message bubble to the left.
More: Pressing and holding on a message will bring up a Copy and More menu. Select more and you can delete messages you don't want to show. Sadly it doesn't delete it at the receivers end though.
Quick photo: If you are talking on iMessage you can press and hold the camera icon to reveal a new menu. Swipe up to take a picture or left to record a video.
Quick Voice message: If you press on the new mic button on the right of the text box you can start recording a verbal message. Lift your finger to stop to reveal a playback button. Once happy either swipe up or tap the arrow to send it or swipe left or tap the x button to cancel.
Details: To see more information about the sender press the word Details at the top right of the screen. It will allow you to send your current location or your constant location.
Mute someone: If someone is constantly badgering you, go into a message from them, press Details, then toggle on the Do Not Disturb button. This works for SMS as well as iMessages.
See attachments: Go into a message from them > Details > and scroll down to reveal all the attachments you've sent them via iMessage.
Delete messages: As before swiping from right to left in the Messages hub and you can quickly delete a conversation.
Delete older messages automatically: Settings > Messages and then scroll down to Message history. Here you can Opt to keep Messages forever, 1 year, or 30 days.
Automatically deleting audio or video messages: Apple by default sets it so once you've sent an audio message it will delete from your iPhone or iPad after two minutes. If you want to keep the message go to Settings > Messages and scroll down to Audio Messages or Video Messages sections and toggle the Expire setting.
Raise to listen to audio messages: It's on by default but you can turn off the ability to listen and reply to incoming audio messages by raising your phone. To turn it off go to Settings > Messages and toggle Raise to Listen.
Blue vs green: Blue is for iMessages, green is for SMS messages
Send iMessage as SMS: If you are having trouble sending your iMessages (over data) you can opt to have iOS 8 revert to sending the message as a SMS instead. Go to Settings > Messages and tick the relevant box.

iOS 8 iCloud tips

Turn on iCloud Drive: Go to Settings > iCloud > iCloud Drive. Here you can control which apps have access to your iCloud drive and whether or not they can use Cellular / Mobile Data.
Manage your Storage: Settings > iCloud > Storage. From here you can see how much storage you have, how much you have left, and whether you want to buy any more.
Family Sharing: Rather than have your iTunes account on all your family's iPhones and iPads you can now set up Family Sharing for up to 5 people. Go to Settings > iCloud > and follow the set up procedure.
Secure iCloud Keychain Access: Go to Settings > iCloud > Keychain and select the Approve with Security Code to add an extra layer of protection to your passwords.
Send last location so you can find it even when the phone is dead: Apple's added a cool hidden feature that will automatically send the last know location to Apple when your battery is critically low. Even if the battery dies as you've lost the phone behind the back of the sofa you can still at least have some idea where it got to.

iOS 8 Notifications tricks

Quick Reply: When a notification comes in depending on whether its enabled by the developer you can reply there and then without having to open the specific app. To do this pull down the notification to reveal the actions you can take. iMessages for example let you reply there and then.
Delete notifications from the Lock screen: If it's a notification from an app simply swipe from right to left and then press the x button.
Delete or Mark as read: Without even opening your phone you can also delete or mark as read emails. Swipe from right to left to reveal both options.

iOS 8 Photos tips


Time-Lapse something: A new setting in the camera app for iOS 8 is the ability to create a time-lapse video with little to no effort. To do this swipe sideways in the camera app to reveal the Time-Lapse mode. Once you've worked out what you are going to film press the red record button. Don't for get it speeds everything up so you should film for at least 30 seconds to see the effects.
Slow-Mo at 240 fps or 120 fps: The iPhone 6 and iPhone 6 Plus allow to now record at 240 fps in Slow-Mo mode. If that's too slow you can revert back to the 120 fps first introduced in iOS 7. Do to this tap on the 240 fps icon when in Slow-Mo mode.
Record video at 60 fps: If you've got the new iPhone 6 or iPhone 6 Plus Apple offers you the chance to record 1080p at 60fps but turns it off by default. To turn it on go to Settings > Photos & Camera > Record Video at 60 FPS and turn it on. To switch between 30 fps and 60 fps click on the icon in video mode when you go to record.
AE/AF Lock: To change the exposure or the focus of your shot, tap anywhere on the screen and it will change instantly. To lock that exposure or focus (great for dramatic panoramas) press and hold on the screen until the square box "locks in".
Changing exposure on the fly: Once you've found your focus point (the big yellow square) in the Camera app press on the small sun icon and swipe up or down to change the exposure setting. Up to make it brighter, down to make it darker.
Activating Timer mode: In the Camera app there is no a small stop watching looking icon next to the button that lets you switch cameras from front to rear. press it and then select whether you want it on, 3s or 10s. Once on when you take a picture you will get a count down on screen so you can see when its about to snap the shot.
Burst Mode: Users can snap photos in Burst mode by either holding their finger on the shutter or on the volume key to take a burst of photos as the action happens. Once you've taken a Burst of photos you can then choose your favourite one, although iOS 7 will try to do this for you. To select the one you want, press Favourites, and then select the one you want to use. The one Apple has chosen is represented by a grey circle underneath. To delete a photo Burst go to Photos select the photo Burst (it will look like it has two further images stacked behind it) and press on the delete key. It will ask you whether you want to delete all photos from this Burst, click on the red words "Delete Photos".

Photo tips for iOS 8

Editing photos: Find the photo you want and press the Edit button. Here you can press on the wand (as before) to auto enhance your photo or press on the icon that looks like a volume knob with dots around it. The later will bring up three new sub menus: Light, Color, B&W with various granular settings within them. If you select Light you can then gesture left or right to make the picture lighter or darker.
Straightening your photos: You can now quickly and easily straighten your photos. To do so select the cropping tool in Photos > Edit and then move the dial that appears on screen.
Search Photo albums: Go to the Photos app and press on the magnifying glass. Immediate suggestions include narrowing your image results by Nearby, One Year Ago, and Favourites however you can type in lots of different searches like places or months. All the shots I've taken in March in London please.
Upload Photo Bursts: Settings > iCloud > Photos > Upload Burst Photos. Doing this will back up all the photos in the burst rather than just the favourite one.
Favourite your favourite photos: If you've got photos that you want to mark to show others quickly later rather than searching or scrolling for them you can favourite them instead. To do this simply find the image you want to favourite and press the heart button. To find them quickly to into the Photos app and press on the Albums icon at the bottom right in the Moments view. Then select Favourites.
Better viewing Shared activity: Turn the phone or iPad sideways. It looks nicer.
Quickly finding a photo in Years: To quickly scan the hundreds of images you've taken over a year simply press and hold your finger on the screen and run it over the images you've got. Like scanning through a YouTube video, moving your finger will reveal a quick thumbnail of the pictures you've taken.
See where you took a photo: In the Moments page in Photos tap on the location of where the collection of photos was taken and you'll be able to see on a map where in the world you were when you took it.
Hide a photo: Find the photo you want to hide from Moments, Collections and Years, and do a long press on the photo itself. When the option comes up to hide, select that option and then confirm your choice. The phone is still available by Albums.
Turn on iCloud Photo Library (Beta): To turn on the new iCloud Photo Beta Library feature that will mean all your photos are automatically uploaded and backed up to the iCloud go to Settings > Photos & Camera and then toggle the iCloud Photo Library (Beta) option. To get more info on what it does and how to take advantage of it read our Apple iCloud Photo Library in Beta explained: What is it and how does it work? feature.

Apple Announces No Questions Asked 14-Day Refunds on App Store, iTunes in EU

itunes_store_screenshot_apple_official_site.jpg

It seems Apple has finally introduced a new return policy to tackle App Store and iTunes refunds in at least European countries.Recent reports claimed that Apple has introduced a new 14-day "no-questions-asked return policy" for purchases through its App Store, iBooks, and iTunes storefronts.
(Also see: How to Get Refunds on iTunes, App Store, Google Play, Windows Phone Store, BlackBerry World)
Notably, Apple is yet to officially announce the new return policy, and it was spotted by a German publication iFun and later picked by 9to5mac. The report claims the new 14-day return policy is now available in several European countries such as Germany, France and the UK among others.
The updated legal terms and conditions page on Apple UK site notes, "Right of cancellation: If you choose to cancel your order, you may do so within 14 days from when you received your receipt without giving any reason, except iTunes Gifts which cannot be refunded once you have redeemed the code."
"To meet the cancellation deadline, you must send your communication of cancellation before the 14-day period has expired," it adds.
Earlier, Apple's terms and conditions for the two stores stated, "Users had the right to withdraw from a transaction without charge and without giving any reason until delivery of the product has started," according to 9to5mac.
The report points out that previously Apple stressed that "all sales and rentals of products are final"; though some exceptions were handled by Apple support.
The updated terms and conditions page further adds that the users who request for return will be refunded in 14 days via the same payment mode used for the transaction. It writes, "Effects of cancellation: We will reimburse you no later than 14 days from the day on which we receive your cancellation notice. We will use the same means of payment as you used for the transaction, and you will not incur any fees for such reimbursement."
The current move by the Cupertino-based giant can be seen as an attempt to tackle the issue of adults and children racking up credit card bills by making "in-app" purchases, which the European Commission had raised back in July.
In comparison to Apple, Google, back in September, updated its refund-window for purchased apps on Google Play with a window of just 2 hours. Google's 'Return paid apps and games' support page had noted "After purchasing an app or game on Google Play, you can return it within two hours for a full refund."

twitter_recap_feature_ios_official.jpg
In November, Twitter had announced that there is a 'while you were away' recap feature in testing, and earlier this month some users reported the feature had started rollling out to them.Now on Wednesday, Twitter officially posted a blog post announcing that the feature is called 'Recap', and will be visible to users with a 'While you were away...' heading. Twitter said Recap will begin rolling out to iOS users starting Wednesday, and soon for Android and Twitter on Web.
The company said that with a few improvements to the home timeline such as Recap, it can deliver a better experience without compromising the realtime nature of Twitter.
"A lot can happen while you're on the go. To fill in some of those gaps, we will surface a few of the best Tweets you probably wouldn't have seen otherwise, determined by engagement and other factors. If you check in on Twitter now and then for a quick snapshot of what's happening, you'll see this recap more often; if you spend a lot of time on Twitter already, you'll see it less," noted Paul Rosania, Product Manager at Twitter.
Meanwhile, the company has introduced the Web version of the Digits app for developers to offer logins via a phone number. Digits, which lets people create an account or sign into an app using phone number, is already available for Android and iOS apps.
With the Digits SDK for Web, developers can create the ability to login to apps via SMS-based login system, though it will still need to be set up on Android and iOS first. When the login is required for an app's website, users will be able to login with the same phone number as on the phone.
Additionally, for users with multiple Digits-enabled apps with accompanying sites, the previous login from a browser will be remembered, so that users will not need to log in again.
 

WhatsApp Web Brings Popular Messaging App to Your Desktop

whatsapp_web.jpg
WhatsApp announced the launch of WhatsApp Web on Wednesday, marking the official debut of the popular messaging app on non-mobile platforms.
"Today, for the first time, millions of you will have the ability to use WhatsApp on your Web browser," the messaging app said announcing WhatsApp Web via a blog post. "Our Web client is simply an extension of your phone: the Web browser mirrors conversations and messages from your mobile device - this means all of your messages still live on your phone."
( Also see: WhatsApp Web Feels Like a Hack But Works Surprisingly Well )
WhatsApp has become ridiculously popular around the world, with over 700 million monthly active users, and while we've come to rely on the app as much as the next person, we've never liked the fact it can be accessed only on the phone. Yes, there are some workarounds for getting WhatsApp on a PC, but if, like us, you hate shuffling between the mobile and PC at work just to be able to use WhatsApp, WhatsApp Web will be music to your ears.
Simply head over to WhatsApp Web and as long as you are using Google Chrome, you'll be given a chance to scan a QR code on the desktop screen via the WhatsApp app on your mobile. Make sure you are using the latest version of WhatsApp on Android, Windows Phone, or BlackBerry. If you are using WhatsApp on iPhone or wish to use a browser other than Chrome on your desktop, you are out of luck.
( Also see: How to use WhatsApp Web )
At the time of filing this report, the version of WhatsApp for Android that supports this feature was still in the process of being rolled out, so it's possible you may have to wait a while to get your hands on this feature. If you are amongst the lucky few who've been able to get in, let us know your experience with WhatsApp Web so far via the comments.

Twitter Rolls Out Bing Translations for Tweets to Apps and Web

twitter_touch_reuters.jpg
Twitter, soon after re-introducing Microsoft's Bing translations to TweetDeck, has now announced global rollout of the feature for its desktop (Twitter.com) and apps (iOS and Android) platforms. The micro-blogging website on Friday in a tweet revealed the news, saying the feature was powered by Microsoft's Bing Translator.The official Twitter support page notes, "Tweet translation is available on twitter.com, Twitter for iOS, Twitter for Android, and TweetDeck."
With the new feature, users can tap on an individual tweet in a different language and the Twitter app (or desktop version) gives an option of translation with a globe in the upper right-hand corner of a tweet. Tapping on the globe translates the tweet. Once translated, users can see the translated version beneath a phrase, as "Translated from 'language-name' by Bing."
To adjust the tweet translation setting, users will go to account settings after logging-in and locate the Tweet translation section. Next, change the 'Tweet translation' setting by checking the box next to Show Tweet translations.
It's worth noting that Twitter has been working on Bing translation service for a long time and a report in June showed screenshots taken by users showing Twitter for iOS testing the feature. The feature again popped during the FIFA 2014 on apps before disappearing from all platforms completely.
Twitter on Thursday officially announced the rollout of 'while you were away' recap feature that was said to be in testing, and was also being reported to have been seen by some users.
The company in a blog post revealed that the feature is called 'Recap', and would be visible to users with a 'While you were away...' heading. Twitter said Recap would begin rolling out to iOS users, and soon for Android and Twitter on Web.

Better Battery Life And Faster Charging: 11 Tricks For The iPhone 6

Faster charging with an iPad charger
You can charge your iPhone 6 faster with an iPad charger without damaging the battery. The team over at iLounge found that both the iPhone 6 and 6 Plus can charge faster with a 2.1A power supply, even though both models ship with a 1A supply. This means you should be able to fully charge an iPhone 6 Plus in two hours flat.
What’s draining your battery?
Battery-usage-1
One of iOS8’s niftiest features is the ability to monitor what apps are draining your battery. Previously shrouded in mystery, you can now see a full list of apps that are siphoning the most amount of battery power – even when they’re not in use. Go to General>Usage>Battery Usage to pinpoint the culprits.
Hide photos
You can now save yourself the embarrassment of accidently showing a friend one of your ‘personal’ photos with the new hide feature on the iPhone 6. You can select which photos you want hidden and they will be filed away in the ‘hidden folder’. Simply long-press a photo and select the option to hide. The photo will then be hidden away from Collections, Moments and Years, but still visible in Albums.
Do not disturb
You can mute alerts for text messages from specific people by selecting the ‘do not disturb’ option in the details menu in a message. This means that if you’re expecting a number of texts from one person, you can avoid having your phone constantly go off.
Credit card scanner
Instead of typing in your credit card details when you’re buying something via Safari, you can scan your card instead with the iPhone’s camera. The option will automatically appear above the keyboard. Select it and hold your card in-front of the camera and it will capture the relevant information.
Bring back deleted photos
If you’ve accidentally deleted a photo, you can resurrect it from the grave by heading over to the ‘recently deleted’ album, where deleted photos are stored for 30 days before they’re wiped forever.

Go Grey with dignity
iOS8-has-a-Grayscale-features-that-turns-your-iPhone-black-and-white.--1940x1091
You can turn on a Grayscale mode that turns everything black and white if you’re so inclined. Whilst it won’t preserve your battery life, it does provide an important accessibility feature for those affected by colour-blindness. Go to Settings>General>Accessibility>Grayscale.
Self-destructing photos
You can send photos to other iMessage users that will self-destruct after a set period of time - Ã  la Snapchat. When sending an  iMessage, hold down the camera icon, which brings up the camera app, and any pictures of video sent from here will self destruct two minutes after delivery.

HTC One M8 tips and tricks


How to Get the Most Our of Your HTC One M8

The HTC One M8 is without a shadow of a doubt the best phone to come out of HTC's labs for quite some time. More than just a cosmetic revision of last year's popular HTC One, this new phone boasts a beefier processor, improved software and a raft of new features that allow it to compete with the Sony Xperia Z2 and Samsung Galaxy S5 on more than equal terms.

However, if you're a newcomer to smartphones - or are moving over from another operating system,such as iOS - then chances are you'll find the HTC One M8 ever so slightly intimidating. That's where we come in.

Below you'll find handy hints, tips and secrets that will let you tame your powerful new mobile companion and look impossibly cool in front of your mates. Maybe.

 Disable BlinkFeed

BlinkFeed is HTC's way of aggregating everything that is important to you, including RSS feeds, social networking updates, forthcoming calendar appointments and more. It's a pretty swell application, but Android purists often complain that it feels like it's being forced upon them. If you fall into this camp then you'll be pleased to know that there's a way to disable it completely.

On any homescreen, simply perform a "pinch zoom" gesture with two fingers. You'll see an overview of all your homescreens, with BlinkFeed appearing on the far left. Long-press BlinkFeed and then drag it to the "remove" icon - it will be banished forever, or at least until you decide that you want to reinstate it.

 Use gestures to control your phone quickly and easily

The HTC One M8 is all about gestures, and it comes with a series of quick swipe gestures - branded "Motion Launch" by HTC - which can be used to open certain applications even when your phone's display is powered down and it's sitting on your coffee table.

A double-tap wakes or locks the phone, while swipes from the left and right open BlinkFeed or your home screen respectively. You can wake the phone in the state it was when it locked by swiping up from the bottom of the screen, and swiping downwards fires up the dialer so you can make a call quickly.

Read more at http://www.trustedreviews.com/opinions/htc-one-m8-tips-and-tricks#q5vB2t6J3HLllf1s.99
 

 Take a photo in just two button presses

Sometimes the art of taking a good photo is being quick enough to capture the moment before it passes, and in the case of smartphones it can sometimes take a few seconds for your camera application to even load - by which time the opportunity to be the next David Bailey has long since passed.

Mercifully, HTC has bestowed a quick-snap feature on the One M8 - simply long-press the Volume Up button to activate the camera when your phone is in sleep mode, and then press Volume Down to take the shot.

Control when your phone should be heard

There's nothing more annoying that your phone making a commotion when you're in a quiet office, especially when you own a HTC One M8 with its BoomSound technology and powerful stereo speakers. By using the phone's built-in Do Not Disturb mode you can switch off all of these sounds in one fell swoop, and it's even possible to schedule when your want the mode to be enforced.

Simply got to Settings > Sound and switch "Do Not Disturb" on. To schedule when you'd like it to be active, tap the Do Not Disturb field a second time.

 Hide annoying and pointless applications

HTC has done a decent job of keeping bloatware applications to a minimum on the One M8, but you may still find yourself wanting to get rid of some of the more annoying programs in your app drawer. Bloatware is so named because it cannot be uninstalled, but you can still hide it from view.

In the app drawer, tap the three dot icon in the top-right corner of the display and then select Hide/Unhide apps. Tick the ones you want to remove from view and you'll be on your way to a less cluttered phone.

Answer a call just by picking the phone up

There's nothing more natural than scooping up a phone and answering it in one motion, and the HTC One M8 allows you to do just that. Using the proximity sensors located near the top of the device, the handset can tell when you've placed it next to your ear and will automatically answer the call.

 Customize the LED for certain notifications

LED notifications are handy when your phone is muted as they allow you to see when you've got messages awaiting your attention. You can customise when the LED fires by going to Settings > Display & Gestures > Notification Light.


Read more at http://www.trustedreviews.com/opinions/htc-one-m8-tips-and-tricks#q5vB2t6J3HLllf1s.99
 

Change channels with your phone

The HTC One M8 boasts an IR blaster, which means you can use it as a conventional remote control to change channels, toggle the volume and generally perform other tasks. You'll need to tell the phone which brand of TV you own for it to work properly, but once you've done this you'll never have to fumble around the living room for your remote ever again. You'll find this feature in the TV app.

Free up storage by saving your photos to an SD card

The HTC One M8 comes with a memory card slot, which means you can free up valuable internal storage space by purchasing cheap and roomy external media. After fitting the card you should see a prompt appear the next time you open the camera application which will give you the option to save all videos and photos to SD. You can change back to internal storage at any time by dipping into the camera app's settings menu.

Show your battery level as a percentage

By default, the HTC One M8 displays your current battery stamina as an icon rather than a percentage, which gives a quick visual indication of how much juice remains in the tank but isn't entirely precise. Thankfully, you can display a percentage by going to Settings > Power > Show Battery Level.

Enable developer mode

Android phones come with Developer Mode disabled by default, largely because the options included within it aren't going to make a lot of sense to novices. However, there are certain things you'll want to do which require this mode to be active, and switching it on is really easy - drop into Settings > About > Software Information > More, and then tap the "Build" section several times until you see a prompt informing you that you are now a developer.

Make your phone even faster by enabling ART runtime

With Developer Mode enabled (see the previous hint) you can switch on the experimental ART runtime. Android currently uses Dalvik Runtime, but Google is going to move over to ART in a future update. ART is a "Ahead of time" compiler, and should - in theory - make your phone feel faster. You can always revert back to Dalvik if you don't find it to your liking, but we think that the difference is genuinely noticeable.
Read more at http://www.trustedreviews.com/opinions/htc-one-m8-tips-and-tricks#q5vB2t6J3HLllf1s.99

Create an animated GIF from a Zoe clip

HTC's Zoe shooting mode complies a video from a set of images, and is a great way to share precious moments with others. It's even easier to exchange these memories thanks to the option to transform a segment of a Zoe clip into an animated GIF file, which can be viewed on most phones, tablets and computers. Simply select the Zoe clip, tap "Edit" and then select "GIF Creator".

Snap a selfie in double-quick time

Selfies are relatively tiresome, but they seem to be in fashion at the moment, and HTC is making sure it stays on the cutting-edge by including a "Selfie" shooting mode in the One M8's camera app. Simply tap the Shot Type icon in the bottom-right corner of the camera application and select Selfie, and the front-facing camera will be ready for your moment of vain, self-indulgent glory.

 Transfer data from your old phone

While moving from one Android phone to another is fairly easy thanks to the fact that much of your data is tied to your Google account, it's less straightforward to move from another phone maker, such as Apple. HTC has your back though and has included a transfer option which allows you to port a surprisingly large amount of content and data over from your previous device.

Enable faster typing

Trace-to-type has been available on Android for ages thanks to the availability of the Swype keyboards, but many handset makers are now baking it into the firmware - and HTC is no exception. When the keyboard is open, long-press the key with the "cog" icon to access the keyboard settings menu. Make sure "Trace keyboard" is ticked and you're away.

 Secure your phone with Kid Mode

Smartphones are amazing, and given how much they keep adults occupied it's little wonder that kids are just as enthralled by them. However, before handing over your shiny new HTC One M8 to your offspring to keep them quiet during a long car journey you'll want to make sure that they don't mess about with your settings or access any apps they shouldn't.

That's where Kids Mode comes in. You can turn it on by long-pressing the power button and selecting Kids Mode, and once triggered, it can only be disabled by entering the owner's date of birth and a unique pin code.
 

Mute your ringer without cutting off the caller

Unwanted calls are bad enough, but having to end them during a meeting to ensure that your ringtone doesn't annoy anyone is even worse - not least because the caller knows you've willfully cut them off.

With the HTC One M8 you can avoid this potentially sticky situation by simply flipping your phone over when it rings; the caller's phone will continue to ring through, making it seem less like you're trying to avoid them.

Read more at http://www.trustedreviews.com/opinions/htc-one-m8-tips-and-tricks#q5vB2t6J3HLllf1s.99


Access Quick Settings even faster

Swipe down with two fingers from the top of the screen and you'll notice that instead of the usual notifications pane you'll be presented with your Quick Settings page - a screen that normally takes another tap to access.

 Customize Quick Settings to suit your needs

The Quick Settings menu is packed with handy shortcuts, but you may find that some are less useful than others. Fear not, as you can mess about with the order of the settings by tapping the Pen and Paper icon in the top-right corner of the screen. Using this method, you can push up the more important toggles to the top of the Quick Settings menu.
Read more at http://www.trustedreviews.com/opinions/htc-one-m8-tips-and-tricks#q5vB2t6J3HLllf1s.99

WhatsApp… that’s it. No Plus or MD or anything else is allowed or licensed by the company.
Update: WhatsApp Plus is shutting down. Developer Mounib Al Rifai announced on Google Plus that the service will shut down as a result of a cease and desist later received from Whatsapp:
Bad news
We have received a cease and desist letter from WhatsApp and we are obligated to remove all download links and unfortunately delete this community…
Am really sorry for this but it’s out of our hands and WhatsApp has pushed us into a corner that we can’t escape this time..
It was a fun ride but it has come to an end..
Deepest regards from Rafalense and me and all the whatsapp+ team for your support
Original post:
It’s a given fact that as something becomes more popular, there will be an endless number of “inspired” products that are eager to cash-in on said success story. There are any number of phones and clones. Apps are no different: a simple search for any random Twitter or Instagram user’s account will yield potentially dozens of “similar” services all of which try to make use of the original’s content. Popular texting/chatting omnibus program WhatsApp is no stranger to this, and the company is now taking action.
WhatsApp Plus users have recently been experiencing a 24-hour ban from the service, in no small part because WhatsApp Plus is in no way authorized or licensed by WhatsApp. Here’s the official word, straight from the horse’s mouth:
WhatsApp Plus is an application that was not developed by WhatsApp, nor is it authorized by WhatsApp. The developers of WhatsApp Plus have no relationship to WhatsApp, and we do not support WhatsApp Plus. Please be aware that WhatsApp Plus contains source code which WhatsApp cannot guarantee as safe and that your private information is potentially being passed to 3rd parties without your knowledge or authorization. Please uninstall your application and install an authorized version of WhatsApp from our website or Google Play. Then, you will be able to use WhatsApp.
Whatsapp Official Website (FAQs)
Given that the offending application requires side-loading to install (i.e. it’s not actually available on the Google Play Store), it might be safe to assume this issue isn’t affecting many users. It’s also hardly the only WhatsApp unofficial client for that matter, and indeed there are reports that other third-party app users have been experiencing trouble as well.
In many ways, WhatsApp’s warning about the unlicensed source code is a truly concerning one, and something that any person who goes around the “established” way need keep in mind: while some apps might offer extra features or content beyond the original product’s scope, few have the abilities needed to check for any kind of malicious programming embedded within it.

Samsung Galaxy Note7 users in Canada can return their units starting today

Samsung has announced that owners of its  Galaxy Note7  smartphone in Canada can return their units starting October 13 (today). You can br...